- It is the process of automatic addition of names and addresses from a database to letters and envelopes in order to facilitate sending mail, especially advertising, to many addresses.
- Mail Merge is a real time-saver when it comes to sending large mailings. It lets you quickly create custom letters, emails or mailing labels in Word by merging the information you already have in your Excel spreadsheet.
- It needs 3 documents to process.
- Your main document which is a Word document with codes for the personalized fields.
- Your data source which is a Excel file with information about the recipients, one row for each recipient.
- The final Word document with the personalized letters, emails, envelops etc.
- The goal of the mail merge is to combine the data in File 1 and File 2 to create File 3.
Preparing the Excel Spreadsheet for Mail Merge
- When you run a mail merge, your Excel file will get connected to your Word mail merge document, and Microsoft Word will be pulling the recipients' names, addresses and other details directly from your Excel worksheet.
- Column names in your Excel sheet should match the field names you want to insert in your mail merge. For example, to address readers by their first name in your document, you'll need separate columns for first and last names.
- Data entries with percentages, currencies, and postal codes are correctly formatted in the spreadsheet so that Word can properly read their values.
- The Excel sheet to be used in the mail merge should be stored on your local machine.
- Changes or additions to your sheet are completed before it's connected to your mail merge document in Word.
Important things to check:
How to mail merge from Excel to Word
- After creating Excel file you can start the mail merge. In this example, we will be merging the letter with a recipient list in Word 2013.
- If you have already composed your letter, you can open an existing Word document, otherwise create a new one.
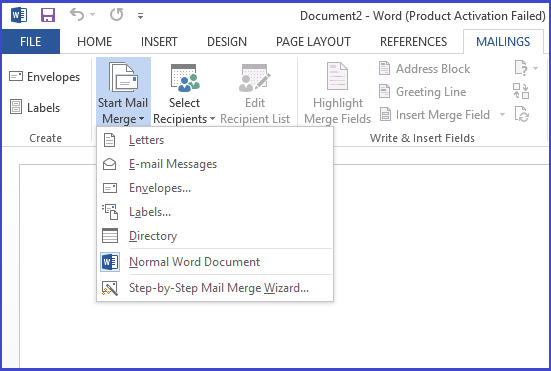
- Choose what kind of merge you want to run. Switch to the Mailings tab > Start Mail Merge group, and select the mail merge type - letters, email messages, labels, envelopes or documents.
- Select the recipients. On the Mailings tab, click Select Recipients > Use Existing List.
- Connect your Excel spreadsheet and Word document.
- In the Select Data Source dialog, browse to your Excel sheet and click Open. If Word prompts you to select a table, do this and click OK.
- You can insert the merge field to fetch the data from Excel file using Insert Merge Field tab.
- Preview the letter. To make sure the recipients data correctly appear in the letter, click the Preview Results button on the Mailing tab.
- You can use the left and right arrows to view each letter with the recipient's data.
- Finish Mail Merge. If you are happy with all the previews, head over to the Finish group and click the Finish & Merge button. Here you can choose to print the letters or send them as email messages.
- Save the mail merge document. You save the mail merge file as a usual Word document by clicking the Save button or pressing Ctrl+S.


No comments: